
IME Photo Editor
Expert in photo / Image editing
Interface
Pic. 1 The main window.

Pic. 1 – The main window.
Pic. 1:
1 – History tree window;
2 – Toolbar;
3 – Filter selection window;
4 – Filter Parameter settings;
5 – Graphic area;
6 – Status window.
History tree window.
History tree window (see Pic. 2) is meant to work with original and derivative images.
Note: strictly speaking, in the history tree window, the user sees only the images, although, in fact, each element of the tree is a certain structure that stores input parameters and additional data along with the image for the correct operation of the filter and the possibility of editing the image. This is the reason for the title of the third item of the top-level menu - «History item». Further in the text, expressions like “adding an image” and “applying a filter” will be mentioned. And according to the meaning and, from the point of view of the user, it is one and the same.

Pic. 2 – History tree window.
Pic. 1:
-
First original image;
-
Second original image;
-
First original image derivative;
-
Resulting derivative of the first original;
-
Resulting derivative of the second original;
Adding the original image in 4 different ways:
-
From the menu choose “History Node -> New initial…” and add the file from your computer;
-
With a mouse drag the file from Finder to the history tree window;
-
With a mouse drag the library image from the last tab of the filter window. (No. 6 of the right image on the Pic. 3).
-
Drag the file from Safari to the history tree window.
Note: not every image from Safari can be dragged to the history tree window.
After adding a number of derivatives (applying the filters) you may:
-
Re-name the original image as well as the derivative one. Click “History Node -> Rename” or “Rename” of the right click menu. To finish editing click anywhere or press “Enter”;
-
Clone the original or the derivative image, click “History Node -> Clone…” or “Clone…” from the right click menu.
If the original image is selected, the following popup will appear:
-
Create empty (transparent) image. The dimensions and resolution of the image are the same as the original;
-
Clone the original without derivatives;
-
Clone the original with derivatives.
If the derivative image is selected, the cloned image will have the full set of input and additional parameters of the original image filter.
3. Copy the derivative image to the top level (original image level). Click “History Node -> Move on top level” or “ Move on top level ” of the right click menu;
4. Change the filter input parameters. For details see “Adding the new filter” section;
5. Change the sequence of filter application, i.е. image sequence. Drag the image to the appropriate spot.
If the dragged image is a derivative, the program will automatically refresh the resulting image at the end of the list within the original image (No.4 and No.5 on Pic. 2), reflecting the new sequence.
If the dragged image is the original, the sequence of the original images will change. For instance, if the history tree is long, you may put the less needed images at the end of the list;
6. Turn off one or several filters. Uncheck the image and the program will automatically refresh the resulting image without the filter (image);
7. Minimize / Maximize the derivatives within the original. Click Show/Hide right of the original image. This comes in handy when there are a lot of original images.
Note: the Show/Hide will show up on mouse over the original image, so it’s not visible in the Picture.
Deleting the image (both original and derivative) can be done in two ways:
-
By selecting the image and clicking “Backspace” or “Delete” (only on keyboards for Microsoft Windows)
Also, the derivative image can be deleted by clicking the blue circle on the right from the original image.
Note:
-
The blue circle appears only when mouse is over the image, so it’s not visible in the Picture;
-
The program doesn’t require confirmation before deleting. If you delete the file accidentally, you may cancel through “Edit->Undo remove (name of the image)” or press “Command + Z”.
Filter window
See Picture 3.

Pic. 3 – filter window.
Pic. 3:
-
Filter type switch.
-
The filter view switch.
-
Filter group name or library images group name. Further in the text – filter group or image group.
-
Switch position – single unfolding of the filter group.
-
Switch position – multiple unfolding of the filter group.
-
Filter name or library image name. Hereinafter – filter or image.
-
Library images category.
Filter type switch (No.1 Pic. 3) allows switching between the tabs:
-
Favorites tab – a set of mostly used filters. By default (after installation) the program contains a number of filters. But the user can customize the filter selection, add and delete the filters. In order to delete the filter, select the filter, right click and choose “Remove from favorite”. To add the filter select “IME” or “System”, select the filter, right click and choose “Add to favorite”;
-
“IME” tab - a set of designer filters;
-
“System” tab – a set of system filters, i.е. developed by Apple and are a part of Mac OS.
Note: the three tabs are really similar, so Pic. 3 only features the IME tab (left).
-
Library images tab (see Pic.3 (right)). The images are mainly for collages and textures, used to fill the graphic primitives.
Minimizing / maximizing of filters for the first three tabs is by clicking Show/Hide right of the filter group.
Note: Show/Hide appears only on mouse over the filter group, so it’s not visible in the Picture
Minimizing / maximizing of filters for the image tab is by clicking on the triangle left of the image group.
In the switch mode No. 2 in position 4 only one group unfolds. All the rest are folded automatically, if they had been unfolded. Thus, there’s only one unfolded group at any given time (or all folded).
In the switch mode No. 2 in position 5 the maximizing / minimizing of the groups is controlled by the user.
Toolbar
Pic. 4.

Pic. 4:
-
Save the project.
-
Controlling the filter status (derivative image).
-
Filter creation cancellation (derivative image).
-
Compare the image with the original one.
-
Controlling the scale of the graphic area.
-
Filter type switch (see also No.1 on Pic.3).
For details on No.2 and No.3 see section “Adding a new filter”, No.4 and No.5 – “Graphic area” section and No. 6 – “Filter window” section.
Input filter parameters settings window
See Pic. 5.
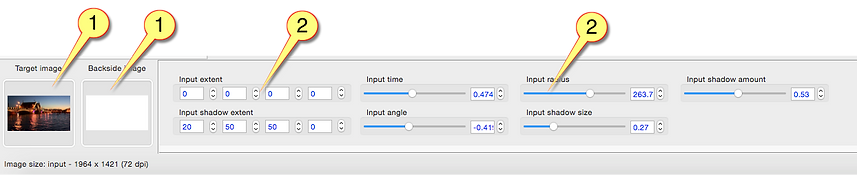
Picture:
-
Masking images window.
-
Settings for the filter input parameters.
Note: masking image is another input filter parameter, as well as height or contrast. Their application is wide and they are not just the masks for the processed image. Some filters feature them as the main background, and a processed image as an auxiliary. Sometimes they are used equally. For instance see No.5 example of a collage (see “Examples” section).
Maximum amount of the masking images is 3.
All control elements are pretty self-explanatory.
Masking image input:
-
Drag the image from the history window to the masking image window;
-
Drag the file from the Finder to the masking image window.
Note: when applying a new filter, with a masking image as an input parameter, the masking image window will have the same image as before.
Graphic area.
Pic.6.
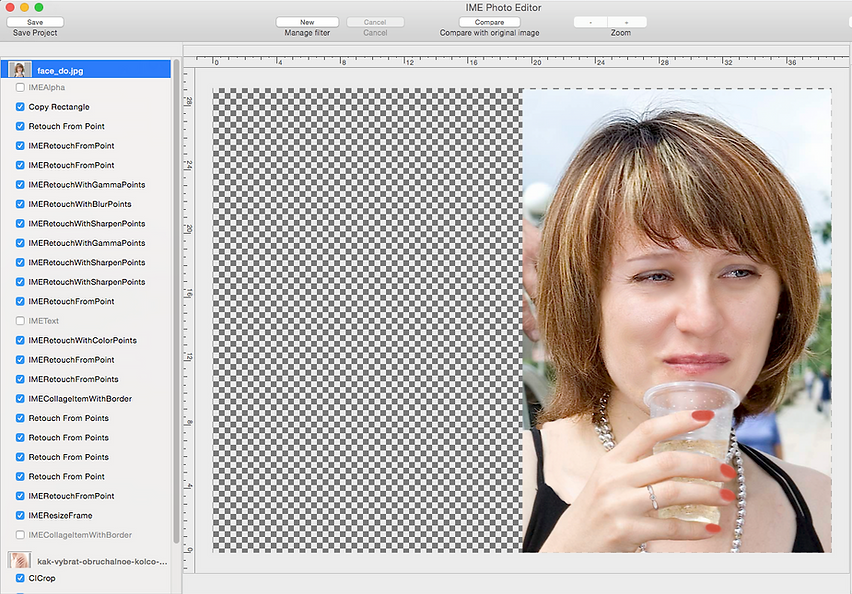
Pic.6 – Graphic area.
ATTENTION! GRAPHIC AREA SHOWS NOT THE SELECTED IMAGE IN THE HISTORY TREE, BUT THE RESULTING DERIVATIVE OF THE ORIGINAL ONE.
For instance (see Pic.2), if we select the image No.1 or No.3, the graphic area will show No.4; if we select No.2, the graphic area will show No.5.
If we were to turn off the resulting derivative image (uncheck No.3 or No.5), the previous checked image will be displayed.
Note: turning off the image doesn’t lead to the selection change in the history window.
If you need the selected image to show up, you must uncheck all subsequent images within the original.
If you need the original image to show up, press and hold down No.4 (see Pic.4).
For instance, on Pic.6 the first original image is selected. Filters IMEText and IMECollageItemWithBorder are off. The graphic area shows the result of the IMEResizeFrame filter application.
Note: there’s a small number of filters (For instance Crop), which when you select them have the previous (not turned off) and not resulting images showed in the graphic area. This is due to the fact that without the previous image, it’s impossible to pick the correct input parameters of the current filter.
For scaling use No.5 (see Pic.4) or use the mouse wheel while pressing Command key.
For moving in horizontal and vertical use the mouse while clicking on the left button and pressing Command.
Also:
For vertical movement use the mouse wheel.
For horizontal movement use the mouse wheel while pressing Shift.
Status bar.
The status bar provides information about dimensions (in pixels) and resolution (DPI) of the image before, during and after the filter application.
In some cases additional information is shown in the status bar.