
IME Photo Editor
Expert in photo / Image editing
Body retouching.
PLEASE NOTE! THE PICTURE OF A WOMAN WAS RANDOMLY CHOSEN FROM THE INTERNET AS A DEMONSTRATION OF WHAT MAY BE CONSTRUED AS “FLAWS” (ACCORDING TO THE GENERALLY ACCEPTED STANDARDS) FOR DEMONSTRATION AND TEACHING PURPOSES.
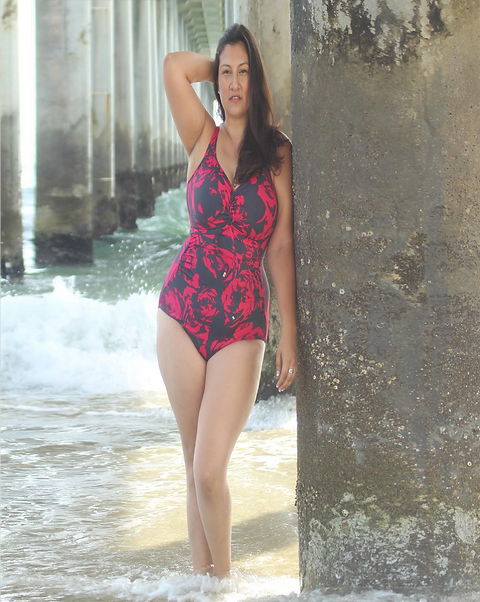
See the results on Pic.8.

Pic.8 – Results.
-
Create a new project (Project->New) and save it, for instance, under the name “Body retouching.ime”.
-
Switch the filter window to the “Library” tab and select the “Example”. Unfold the category “Body retouching” and frag the image (file) “Thick girl.png” from the filter window to the history tree window. The first original image is done (see Pic.9). You can now re-name the image, for instance “Thick girl”.

Pic.9 – Creating the first original image.
3. Now we work on the body. We apply the “Bump Distortion Linear” filter to the first original image with the input parameters as shown on Pic.10. You may change the settings to achieve a different effect.

Pic.10 – “Bump Distortion Linear” input parameters.
The result is the image on Pic.11.

Pic.11 – “Bump Distortion Linear” application result.
As you can see, the head here is disproportioned, but we will deal with it later.
Note: The filter input parameters are the way that the whole image is thinned, even the background. It’s more complicated to just thin out the body without touching the background. In order to be concise, we will deal with the head only.
4. Work on the body a little more.
Apply the filter “Bump Distortion”, so that the swimsuit is no longer “tightening” on the left hip. (Pic.12).
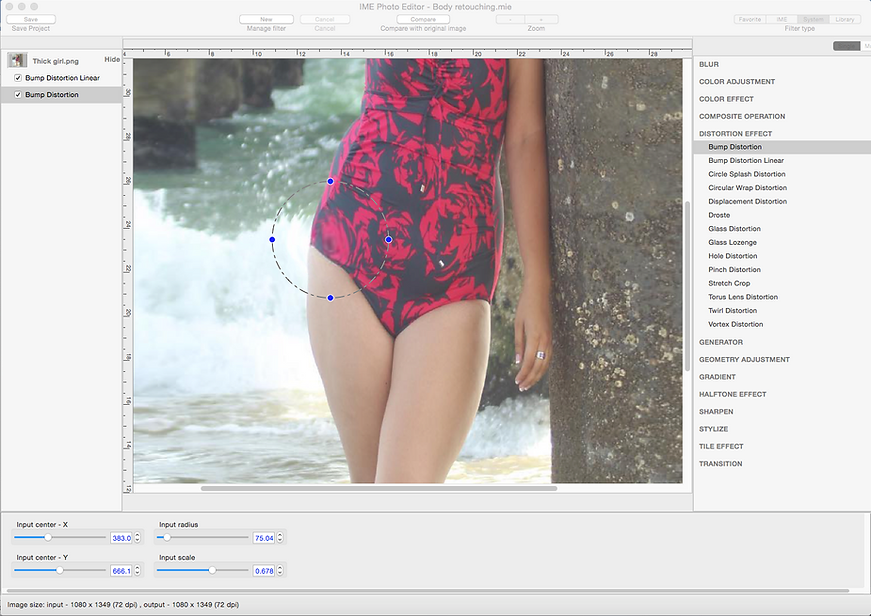
Pic.12 –“Bump Distortion” on the left hip.
5. Remove the “tightening” from the right hip. In order to do that we clone the latest image (filter) and edit the input parameters (Pic. 13).
Note: Cloning is described in the history window section (see above).

Pic.13 –“Bump Distortion” for the right hip.
6. Repeat the sequence of four actions similarly to the previous paragraph:
-
Decrease the waist on the left – Input center – X = 434.464, Input center – Y = 811.974, Input radius = 104.991, Input scale = -0.651;
-
Decrease the waist on the right – Input center – X = 563.606, Input center – Y = 764.761, Input radius = 85.55, Input scale = -0.428;
-
Enhance the left breast – Input center – X = 463.461, Input center – Y = 911.913, Input radius = 89.637, Input scale = 0.457;
-
Enhance the right breast – Input center – X = 577.913, Input center – Y = 885.344, Input radius = 85.55, Input scale = 0.638.
The result is Pic.14:
Pic.14 – “Bump Distortion” result.
PLEASE NOTE! THE CHOICE OF INPUT PARAMETERS IS NOT AUTHOR’S PERSONAL VIEW BUT RATHER A GENERALLY ACCEPTED STANDARD. THE USER MAY CHOOSE ANY INPUT PARAMETERS BASED ON THEIR PREFERENCES.
Here we suspend the editing and get back to the head. For this we create the second original image.
7. In order to create the second original image for the head editing, we clone the first original image. In the unfolding list we select creating the image without history (Pic.15).

Pic.15 – creating the second original image.
Note: Cloning the original image is described in the history window section (see above). The second original image will be added to the end of the list of the history tree.

Pic.16 – The second original image created.
Note: you can also create a second original image by dragging the file according to the par.2 of this section.
For our convenience we re-name the new image “Face”, drag it to the very top of the tree and minimize the first original image.
8. With selected second original image, crop (highlight) the head only (Pic.17) for further editing (“Crop” filter).

Pic.17 – Leaving the head only for editing.
9. Remove the background. Apply the “Alpha By Points” filter. There are only two input parameters available: point size and the intensity of the alpha channel, i.e. transparency.
ATTENTION! THE SPEED OF EDITING DEPENDS SIGNIFICANTLY ON THE NUMBER OF POINTS, INSIGNIFICANTLY ON THE DIMENSIONS AND DOESN’T DEPEND ON THE INTENSITY.
With this in mind, the author usually removes the background (makes it transparent) in two-three, and sometimes four takes, gradually decreasing the size of points. For this instance, the result is on the Pic.18.
Point size: 40 points; 10 points; 3 points. The last stage – the finishing touch – by the head contour (hair in this case).
You can do it in one step with the size 3, but in this case the number of points will be about 5000!!! Your processor will have a really hard time editing (unless you have a super-computer).

Pic. 18 – Removing the background in three steps
Here we have the head with no background – Pic. 18а.

Pic. 18а – Removing the background.
Note: more detailed description of the used filters (i.е. point position), based on pixel array (IME Retouch From Point, IME Retouch From Points, Alpha By Points etc.) is impossible due to the lack of data on the points position. This is due to the fact that the number of points can be up to 1000 and more, and the user won’t be able to match all the points with their coordinates.
10. In order to avoid sharp transition while applying the head to the main image (which is really noticeable) we blur out the edges a little with “Retouch With Blur Points”. See Pic.19 for results.

Pic. 19 – Blurred out hair edges.
Note: as mentioned above, the author cannot provide information on the number of points and coordinates in this example. The user must do it themselves, hopefully better than the author would.
11. The author thinks that the facial expression doesn’t correspond with the woman’s mood. Let’s try and fix that.
First of all we enhance the eyes a little bit, so that they are not “squinty”.
We apply “Bump Distortion” to both eyes – Pic. 20.

Pic. 20 – Enhanced eyes.
12. Now we get to the smile. We add the third original image from the library as we did the first one. Apply the Crop filter – Pic. 21.

Pic. 21 – Adding a smile as the third original image.
13. Repeat the actions as we did with the head, resulted image on Pic. 22.

Pic. 22 – The smile is ready to be put on the face.
14. Inserting the smile. Apply the filter “Collage Item With Transform”.

Pic. 23 –The smile is inserted.
15. We remove the fine lines, retouch the lips and the unnatural whiteness of the teeth.

Pic. 24 – The smile within the head image - 2.
Note: as mentioned above, the author cannot provide information on the number of points and coordinates in this example. The user must do it themselves, hopefully better than the author did.
16. We bring color to the lips using the “Retouch With Gamma Points” filter.

Pic. 25 – Smile within the head image - 3.
Note: “Retouch With Gamma Points” enhances the color characteristics.
17. Select the first original image (the third one in the tree), add the head (‘Collage Item With Transform” filter) and …

Pic. 26 – The head exchange.
… then we realize that the background needs editing.
18. Apply the filter “Copy Rectangle”.

Pic. 27 – Copying part of the background.
19. Drag the “Copy Rectangle” filter in the tree and get the result – Pic. 28.

Pic. 28 – The head is done. It won’t be long now.
20. Blur out the transition on the neck and the hair area using “Retouch From Point” and “Retouch With Blur Points”.

Pic. 29 – Blur out the transition.
21. Pic.30 – resulting image.

Pic. 30 – End result.